OSINT tool for real-time monitoring of Spotify users' activities and profile changes including playlists.
✨ If you want to track Spotify friends' music activity, check out another tool I developed: spotify_monitor.
🛠️ If you're looking for debug tools to get Spotify Web Player access tokens and extract secret keys: click here
- Real-time tracking of Spotify user activities and profile changes:
- addition/removal of followings and followers
- addition/removal of playlists
- addition/removal of tracks in playlists (including collaborator info for newly added tracks)
- playlists name and description changes
- number of likes for playlists
- number of collaborators for playlists
- profile picture changes
- username changes
- Email notifications for various events (as listed above)
- Attaching changed profile pictures directly to email notifications
- Displaying the profile picture right in your terminal (if you have
imgcatinstalled) - Additional functionalities on top of the monitoring mode allowing to display detailed info about the user, list of followers & followings, recently played artists and possibility to search for users in Spotify catalog with specific names
- Ability to display and export the list of tracks for a specific playlist (including Liked Songs for the user who owns the Spotify access token)
- Saving all profile changes (including playlists) with timestamps to the CSV file
- Clickable Spotify, Apple Music, YouTube Music and Genius Lyrics search URLs printed in the console & included in email notifications
- Support for four different methods to get a Spotify access token (
sp_dc cookie,desktop client,OAuth app,OAuth user) - Possibility to control the running copy of the script via signals
- Python 3.6 or higher
- Libraries:
requests,python-dateutil,urllib3,pyotp,pytz,tzlocal,python-dotenv, Spotipy,wcwidth
Tested on:
- macOS: Ventura, Sonoma, Sequoia
- Linux: Raspberry Pi OS (Bullseye, Bookworm), Ubuntu 24, Rocky Linux 8.x/9.x, Kali Linux 2024/2025
- Windows: 10, 11
It should work on other versions of macOS, Linux, Unix and Windows as well.
pip install spotify_profile_monitorDownload the spotify_profile_monitor.py file to the desired location.
Install dependencies via pip:
pip install requests python-dateutil urllib3 pyotp pytz tzlocal python-dotenv spotipy wcwidthAlternatively, from the downloaded requirements.txt:
pip install -r requirements.txt- Grab your Spotify sp_dc cookie and track the
spotify_user_uri_idprofile changes (including playlists):
spotify_profile_monitor <spotify_user_uri_id> -u "your_sp_dc_cookie_value"Or if you installed manually:
python3 spotify_profile_monitor.py <spotify_user_uri_id> -u "your_sp_dc_cookie_value"To get the list of all supported command-line arguments / flags:
spotify_profile_monitor --helpMost settings can be configured via command-line arguments.
If you want to have it stored persistently, generate a default config template and save it to a file named spotify_profile_monitor.conf:
spotify_profile_monitor --generate-config > spotify_profile_monitor.conf
Edit the spotify_profile_monitor.conf file and change any desired configuration options (detailed comments are provided for each).
The tool supports four methods for obtaining a Spotify access token.
It can be configured via the TOKEN_SOURCE configuration option or the --token-source flag.
Recommended: cookie
Uses the sp_dc cookie to retrieve a token from the Spotify web endpoint. This method is easy to set up and supports all features except fetching the list of liked tracks for the account that owns the access token (due to recent Spotify token's scope restrictions).
Alternative: client
Uses captured credentials from the Spotify desktop client and a Protobuf-based login flow. It's more complex to set up, but supports all features. This method is intended for advanced users who want a long-lasting token with the broadest possible access.
Safe fallback: oauth_app
Relies on the official Spotify Web API (Client Credentials OAuth flow). This method is easy to set up and safe to use, but has several limitations. The following features are not supported:
- viewing the list of followers/followings
- accessing the followings count (only the followers count is tracked)
- getting the list of recently played artists
- showing other users' playlists added to user profile (unless the user is a collaborator on a playlist owned by other user)
- fetching the list of liked tracks for the account that owns the access token
- searching for Spotify users by name
Personal: oauth_user
Dedicated to tracking the authenticated user's own account via the official Spotify Web API (Authorization Code OAuth flow). I personally use this mode to monitor changes to my own account - such as new or lost followers/followings, likes on my playlists or when a collaborator adds a new song. You can also use this mode to track other users.
This method is easy to set up and safe to use, but has several limitations.
The following features are not supported when monitoring your own account:
- viewing the list of followers
- viewing the complete list of followings (only followed artists are available; followed users are not included)
- searching for Spotify users by name
Note: If you use oauth_user to monitor your own account, the tool will list all your playlists, including private ones.
The following features are not supported when monitoring another user in this mode:
- viewing the list of followers/followings
- accessing the followings count (only the followers count is tracked)
- getting the list of recently played artists
- showing other users' playlists added to user profile (unless the user is a collaborator on a playlist owned by other user)
- searching for Spotify users by name
If no method is specified, the tool defaults to the cookie method.
Important: It is strongly recommended to use a separate Spotify account with this tool if you obtain access tokens via the cookie or client methods. These methods interact with internal, undocumented endpoints for many features (like retrieving a list of followers/followings, followings count or recently played artists). If you prefer to use your regular Spotify account, consider the oauth_app or oauth_user methods - while they have some limitations, the tool remains fully functional with them. That said, while I've never encountered any issues on my own accounts, I can't guarantee that Spotify won't impose restrictions in the future - you've been warned.
This is the default method used to obtain a Spotify access token.
-
Log in to https://open.spotify.com/ in your web browser.
-
Locate and copy the value of the
sp_dccookie.- Use your web browser's dev console or Cookie-Editor by cgagnier to extract it easily: https://cookie-editor.com/
-
Provide the
SP_DC_COOKIEsecret using one of the following methods:- Pass it at runtime with
-u/--spotify-dc-cookie - Set it as an environment variable (e.g.
export SP_DC_COOKIE=...) - Add it to .env file (
SP_DC_COOKIE=...) for persistent use - Fallback: hard-code it in the code or config file
- Pass it at runtime with
If your sp_dc cookie expires, the tool will notify you via the console and email. In that case, you'll need to grab the new sp_dc cookie value.
If you store the SP_DC_COOKIE in a dotenv file you can update its value and send a SIGHUP signal to reload the file with the new sp_dc cookie without restarting the tool. More info in Storing Secrets and Signal Controls (macOS/Linux/Unix).
NOTE: secrets used for TOTP generation (
SECRET_CIPHER_DICT) expire every two days, that's why since v2.7 the tool fetches it from remote URL (seeSECRET_CIPHER_DICT_URL); you can also run the spotify_monitor_secret_grabber and extract it by yourself (see Secret Key Extraction from Spotify Web Player Bundles for more info).
This is the alternative method used to obtain a Spotify access token which simulates a login from the real Spotify desktop app using credentials intercepted from a real session.
-
Run an intercepting proxy of your choice (like Proxyman - the trial version is sufficient)
-
Enable SSL traffic decryption for
spotify.comdomain- in Proxyman: click Tools → SSL Proxying List → + button → Add Domain → paste
*.spotify.com→ Add
- in Proxyman: click Tools → SSL Proxying List → + button → Add Domain → paste
-
Launch the Spotify desktop client, then switch to your intercepting proxy (like Proxyman) and look for POST requests to
https://login5.spotify.com/v3/login -
If you don't see this request, try following steps (stop once it works):
- restart the Spotify desktop client
- log out from the Spotify desktop client and log back in
- point Spotify at the intercepting proxy directly in its settings, i.e. in Spotify → Settings → Proxy Settings, set:
- proxy type:
HTTP - host:
127.0.0.1(IP/FQDN of your proxy, for Proxyman use the IP you see at the top bar) - port:
9090(port of your proxy, for Proxyman use the port you see at the top bar) - restart the app; since QUIC (HTTP/3) requires raw UDP and can't tunnel over HTTP CONNECT, Spotify will downgrade to TCP-only HTTP/2 or 1.1, which intercepting proxy can decrypt
- proxy type:
- block Spotify's UDP port 443 at the OS level with a firewall of your choice - this prevents QUIC (HTTP/3), forcing TLS over TCP and letting intercepting proxy perform MITM
- try an older version of the Spotify desktop client
-
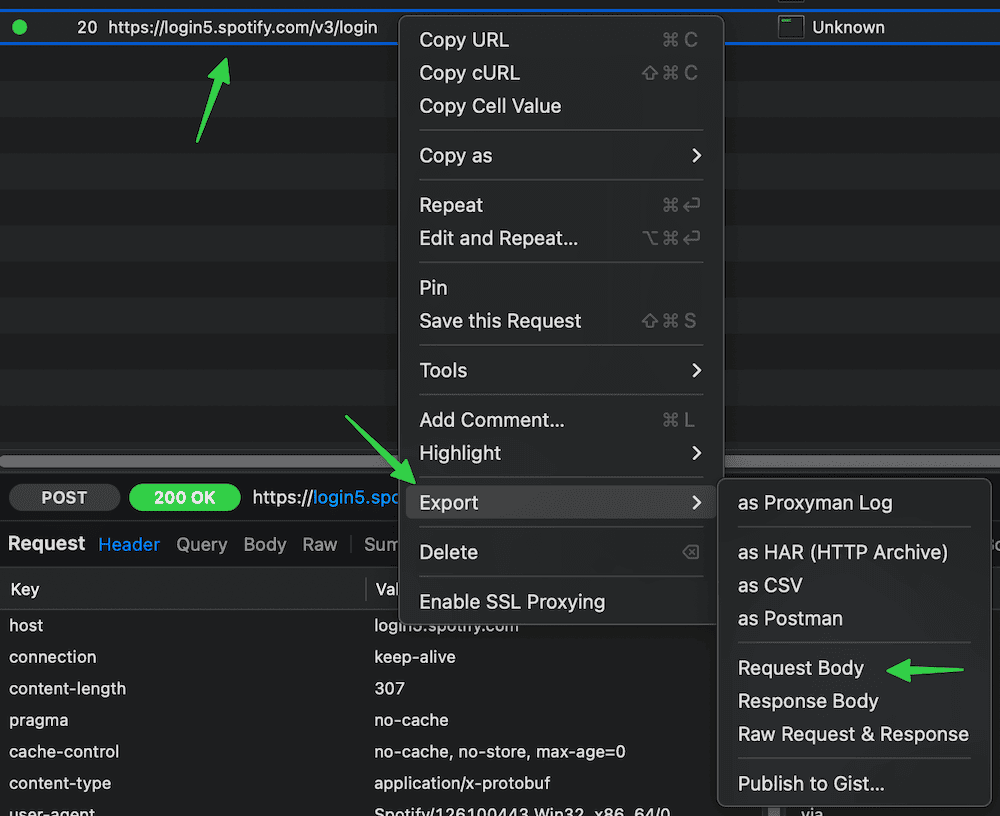
Export the login request body (a binary Protobuf payload) to a file (e.g. login-request-body-file)
- In Proxyman: right click the request → Export → Request Body → Save File.
- Run the tool with
--token-source client -w <path-to-login-request-body-file>:
spotify_profile_monitor --token-source client -w <path-to-login-request-body-file> <spotify_user_uri_id>If successful, the tool will automatically extract the necessary fields and begin monitoring.
Instead of using the -w flag each time, you can persist the Protobuf login request file path by setting the LOGIN_REQUEST_BODY_FILE configuration option.
The same applies to --token-source client flag - you can persist it via TOKEN_SOURCE configuration option set to client.
The tool will automatically refresh both the access token and client token using the intercepted refresh token.
If your refresh token expires, the tool will notify you via the console and email. In that case, you'll need to re-export the login request body.
If you re-export the login request body to the same file name, you can send a SIGHUP signal to reload the file with the new refresh token without restarting the tool. More info in Signal Controls (macOS/Linux/Unix).
Advanced options are available for further customization - refer to the configuration file comments. However, the default settings are suitable for most users and modifying other values is generally NOT recommended.
This method uses an official Spotify Web API (Client Credentials OAuth flow).
-
Log in to Spotify Developer dashboard: https://developer.spotify.com/dashboard
-
Create a new app
-
For Redirect URL, use: http://127.0.0.1:1234
-
Select Web API as the intended API
-
Copy the Client ID and Client Secret
-
Provide the
SP_APP_CLIENT_IDandSP_APP_CLIENT_SECRETsecrets using one of the following methods:- Pass it at runtime with
-r/--oauth-app-creds- Use
SP_APP_CLIENT_ID:SP_APP_CLIENT_SECRETformat - note the colon separator
- Use
- Set it as an environment variable (e.g.
export SP_APP_CLIENT_ID=...; export SP_APP_CLIENT_SECRET=...) - Add it to .env file (
SP_APP_CLIENT_ID=...andSP_APP_CLIENT_SECRET=...) for persistent use - Fallback: hard-code it in the code or config file
- Pass it at runtime with
You can use the same client ID and secret values as those used for the Spotify OAuth User.
Example:
spotify_profile_monitor --token-source oauth_app -r "your_spotify_app_client_id:your_spotify_app_client_secret" <spotify_user_uri_id>The tool takes care of refreshing the access token so it should remain valid indefinitely.
If you store the SP_APP_CLIENT_ID and SP_APP_CLIENT_SECRET in a dotenv file you can update their values and send a SIGHUP signal to reload the file with the new secret values without restarting the tool. More info in Storing Secrets and Signal Controls (macOS/Linux/Unix).
This method uses an official Spotify Web API (Authorization Code OAuth flow).
-
Log in to Spotify Developer dashboard: https://developer.spotify.com/dashboard
-
Create a new app
-
For Redirect URL, use: http://127.0.0.1:1234
-
Select Web API as the intended API
-
Copy the Client ID and Client Secret (the secret is not required if you're using
PKCEmode) -
Provide the
SP_USER_CLIENT_IDandSP_USER_CLIENT_SECRETsecrets using one of the following methods:- Pass it at runtime with
-n/--oauth-user-creds- Use
SP_USER_CLIENT_ID:SP_USER_CLIENT_SECRETformat - note the colon separator
- Use
- Set it as an environment variable (e.g.
export SP_USER_CLIENT_ID=...; export SP_USER_CLIENT_SECRET=...) - Add it to .env file (
SP_USER_CLIENT_ID=...andSP_USER_CLIENT_SECRET=...) for persistent use - Fallback: hard-code it in the code or config file
- Pass it at runtime with
To use PKCE mode, set SP_USER_CLIENT_SECRET to an empty string ("").
You can use the same client ID and secret values as those used for the Spotify OAuth App.
Example:
spotify_profile_monitor --token-source oauth_user -r "your_spotify_user_client_id:your_spotify_user_client_secret" <spotify_user_uri_id>The tool takes care of refreshing the access token so it should remain valid indefinitely.
If you store the SP_USER_CLIENT_ID and SP_USER_CLIENT_SECRET in a dotenv file you can update their values and send a SIGHUP signal to reload the file with the new secret values without restarting the tool. More info in Storing Secrets and Signal Controls (macOS/Linux/Unix).
The easiest way is via the Spotify desktop or mobile client:
- go to your friend's profile
- click the three dots (•••) or press the Share button
- copy the link to the profile
You'll get a URL like: https://open.spotify.com/user/spotify_user_uri_id?si=tracking_id
Extract the part between /user/ and ?si= - in this case: spotify_user_uri_id
Use that as the user URI ID (spotify_user_uri_id) in the tool.
Alternatively you can use the built-in functionality to search for usernames (-s flag) to get the user URI ID:
spotify_profile_monitor -s "user name"It will list all users with such names with their user URI ID.
Before using this feature make sure you followed the instructions here.
This step is optional and only required if you want to use the feature that searches Spotify's catalog for users with a specific name to obtain their Spotify user URI ID (-s flag). To do this, you must intercept your Spotify client's network traffic and extract the required sha256Hash value.
-
Run an intercepting proxy of your choice (like Proxyman).
-
Launch the Spotify desktop client and search for some user
-
Look for requests with the
searchUsersorsearchDesktopoperation name -
Display the details of one of these requests and copy the sha256Hash parameter value (string marked as
XXXXXXXXXXbelow)
Example request:
https://api-partner.spotify.com/pathfinder/v1/query?operationName=searchUsers&variables={"searchTerm":"spotify_user_uri_id","offset":0,"limit":5,"numberOfTopResults":5,"includeAudiobooks":false}&extensions={"persistedQuery":{"version":1,"sha256Hash":"XXXXXXXXXX"}}
- Provide the
SP_SHA256secret using one of the following methods:- Set it as an environment variable (e.g.
export SP_SHA256=...) - Add it to .env file (
SP_SHA256=...) for persistent use - Fallback: hard-code it in the code or config file
- Set it as an environment variable (e.g.
By default, time zone is auto-detected using tzlocal. You can set it manually in spotify_profile_monitor.conf:
LOCAL_TIMEZONE='Europe/Warsaw'You can get the list of all time zones supported by pytz like this:
python3 -c "import pytz; print('\n'.join(pytz.all_timezones))"If you want to use email notifications functionality, configure SMTP settings in the spotify_profile_monitor.conf file.
Verify your SMTP settings by using --send-test-email flag (the tool will try to send a test email notification):
spotify_profile_monitor --send-test-emailIt is recommended to store secrets like SP_DC_COOKIE, SP_APP_CLIENT_ID, SP_APP_CLIENT_SECRET, SP_USER_CLIENT_ID, SP_USER_CLIENT_SECRET, REFRESH_TOKEN, SP_SHA256 or SMTP_PASSWORD as either an environment variable or in a dotenv file.
Set the needed environment variables using export on Linux/Unix/macOS/WSL systems:
export SP_DC_COOKIE="your_sp_dc_cookie_value"
export SP_APP_CLIENT_ID="your_spotify_app_client_id"
export SP_APP_CLIENT_SECRET="your_spotify_app_client_secret"
export SP_USER_CLIENT_ID="your_spotify_user_client_id"
export SP_USER_CLIENT_SECRET="your_spotify_user_client_secret"
export REFRESH_TOKEN="your_spotify_app_refresh_token"
export SP_SHA256="your_spotify_client_sha256"
export SMTP_PASSWORD="your_smtp_password"
On Windows Command Prompt use set instead of export and on Windows PowerShell use $env.
Alternatively store them persistently in a dotenv file (recommended):
SP_DC_COOKIE="your_sp_dc_cookie_value"
SP_APP_CLIENT_ID="your_spotify_app_client_id"
SP_APP_CLIENT_SECRET="your_spotify_app_client_secret"
SP_USER_CLIENT_ID="your_spotify_user_client_id"
SP_USER_CLIENT_SECRET="your_spotify_user_client_secret"
REFRESH_TOKEN="your_spotify_app_refresh_token"
SP_SHA256="your_spotify_client_sha256"
SMTP_PASSWORD="your_smtp_password"
By default the tool will auto-search for dotenv file named .env in current directory and then upward from it.
You can specify a custom file with DOTENV_FILE or --env-file flag:
spotify_profile_monitor <spotify_user_uri_id> --env-file /path/.env-spotify_profile_monitorYou can also disable .env auto-search with DOTENV_FILE = "none" or --env-file none:
spotify_profile_monitor <spotify_user_uri_id> --env-file noneAs a fallback, you can also store secrets in the configuration file or source code.
To monitor specific user for all profile changes (including playlists), just type Spotify user URI ID as a command-line argument (spotify_user_uri_id in the example below):
spotify_profile_monitor <spotify_user_uri_id>If you use the default method to obtain a Spotify access token (cookie) and have not set SP_DC_COOKIE secret, you can use -u flag:
spotify_profile_monitor <spotify_user_uri_id> -u "your_sp_dc_cookie_value"By default, the tool looks for a configuration file named spotify_profile_monitor.conf in:
- current directory
- home directory (
~) - script directory
If you generated a configuration file as described in Configuration, but saved it under a different name or in a different directory, you can specify its location using the --config-file flag:
spotify_profile_monitor <spotify_user_uri_id> --config-file /path/spotify_profile_monitor_new.confBy default, only public playlists owned by the user are fetched. To change this behavior:
- set
GET_ALL_PLAYLISTStoTrue - or use the
-kflag
spotify_profile_monitor <spotify_user_uri_id> -kIt is helpful in the case of playlists created by another user added to another user profile.
Some users don't list all their public playlists on their profile, but if you know a playlist's URI, you can still monitor it.
To do so, add entries to the ADD_PLAYLISTS_TO_MONITOR configuration option. Example:
ADD_PLAYLISTS_TO_MONITOR = [
    {'uri': 'spotify:playlist:{playlist_id1}', 'owner_name': '{user_id}', 'owner_uri': 'spotify:user:{user_id}'},
    {'uri': 'spotify:playlist:{playlist_id2}', 'owner_name': '{user_id}', 'owner_uri': 'spotify:user:{user_id}'}
]
Replace {playlist_id1} and {playlist_id2} with the playlists URI IDs you want to monitor and {user_id} with the owner's URI ID (spotify_user_uri_id).
If you want to completely disable detection of changes in user's public playlists (like added/removed tracks in playlists, playlists name and description changes, number of likes for playlists):
- set
DETECT_CHANGES_IN_PLAYLISTStoFalse - or use the
-qflag
spotify_profile_monitor <spotify_user_uri_id> -qIf you want to skip some user's playlists from processing, you can use PLAYLISTS_TO_SKIP_FILE or -t flag (more info here)
spotify_profile_monitor <spotify_user_uri_id> -t ignored_playlistsThe tool runs until interrupted (Ctrl+C). Use tmux or screen for persistence.
You can monitor multiple Spotify users by running multiple copies of the script.
The tool automatically saves its output to spotify_profile_monitor_<user_uri_id/file_suffix>.log file. The log file name can be changed via SP_LOGFILE configuration option and its suffix via FILE_SUFFIX / -y flag. Logging can be disabled completely via DISABLE_LOGGING / -d flag.
The tool also saves the list of followings, followers and playlists to these files:
spotify_profile_<user_uri_id/file_suffix>_followings.jsonspotify_profile_<user_uri_id/file_suffix>_followers.jsonspotify_profile_<user_uri_id/file_suffix>_playlists.json
Thanks to this we can detect changes after the tool is restarted.
The tool also saves the user profile picture to spotify_profile_{user_uri_id/file_suffix}_pic*.jpeg files.
There is also another mode of the tool which displays various requested information.
If you want to display details for a specific Spotify playlist URL (i.e. its name, description, number of tracks, likes, overall duration, creation and last update date, list of tracks with information on when they were added), then use the -l flag:
spotify_profile_monitor -l "https://open.spotify.com/playlist/playlist_uri_id"

If you want to not only display, but also save the list of tracks for a specific Spotify playlist to a CSV file, use the -l flag with -b indicating the CSV file:
spotify_profile_monitor -l "https://open.spotify.com/playlist/playlist_uri_id" -b spotify_playlist_tracks.csvIf you want to display similar information for Liked Songs playlist for the user owning the Spotify access token, use the -x flag (can also be used with -b):
spotify_profile_monitor -xIf you want to export tracks from -l or -x for direct import into spotify_monitor, use the -o flag to ensure appropriate formatting (optionally with -b to specify the text file where the tracks will be exported):
spotify_profile_monitor -o -x -b spotify_liked_tracks.txt
spotify_profile_monitor -o -l "https://open.spotify.com/playlist/playlist_uri_id" -b spotify_playlist_tracks.txt
If you want to display details for a specific Spotify user profile URL (i.e. user URI ID, list and number of followers and followings, recently played artists, list and number of user's playlists with basic statistics like when created, last updated, description, number of tracks and likes) then use the -i flag:
spotify_profile_monitor <spotify_user_uri_id> -i

By default, only public playlists owned by the user are fetched. You can change this behavior with -k flag. It is helpful in the case of playlists created by another user added to another user profile:
spotify_profile_monitor <spotify_user_uri_id> -i -kIf you want to completely disable the processing of a user's public playlists while displaying details for a specific Spotify user profile URL (to speed up the process), you can use the -q flag:
spotify_profile_monitor <spotify_user_uri_id> -i -qIf you only want to display the list of followings and followers for the user (-f flag):
spotify_profile_monitor <spotify_user_uri_id> -fIf you want to display a list of recently played artists (this feature only works if the user has it enabled in their settings), use the -a flag:
spotify_profile_monitor <spotify_user_uri_id> -aTo get basic information about the Spotify access token owner (-v flag):
spotify_profile_monitor -vIf you want to search the Spotify catalog for users with a specific name to obtain their Spotify user URI ID (-s flag):
spotify_profile_monitor -s "user name"To enable email notifications for all user profile changes (including playlists):
- set
PROFILE_NOTIFICATIONtoTrue - or use the
-pflag
spotify_profile_monitor <spotify_user_uri_id> -pTo disable sending an email about new followers/followings (these are sent by default when the -p flag is enabled):
- set
FOLLOWERS_FOLLOWINGS_NOTIFICATIONtoFalse - or use the
-gflag
spotify_profile_monitor <spotify_user_uri_id> -p -gTo disable sending an email on errors (enabled by default):
- set
ERROR_NOTIFICATIONtoFalse - or use the
-eflag
spotify_profile_monitor <spotify_user_uri_id> -eMake sure you defined your SMTP settings earlier (see SMTP settings).
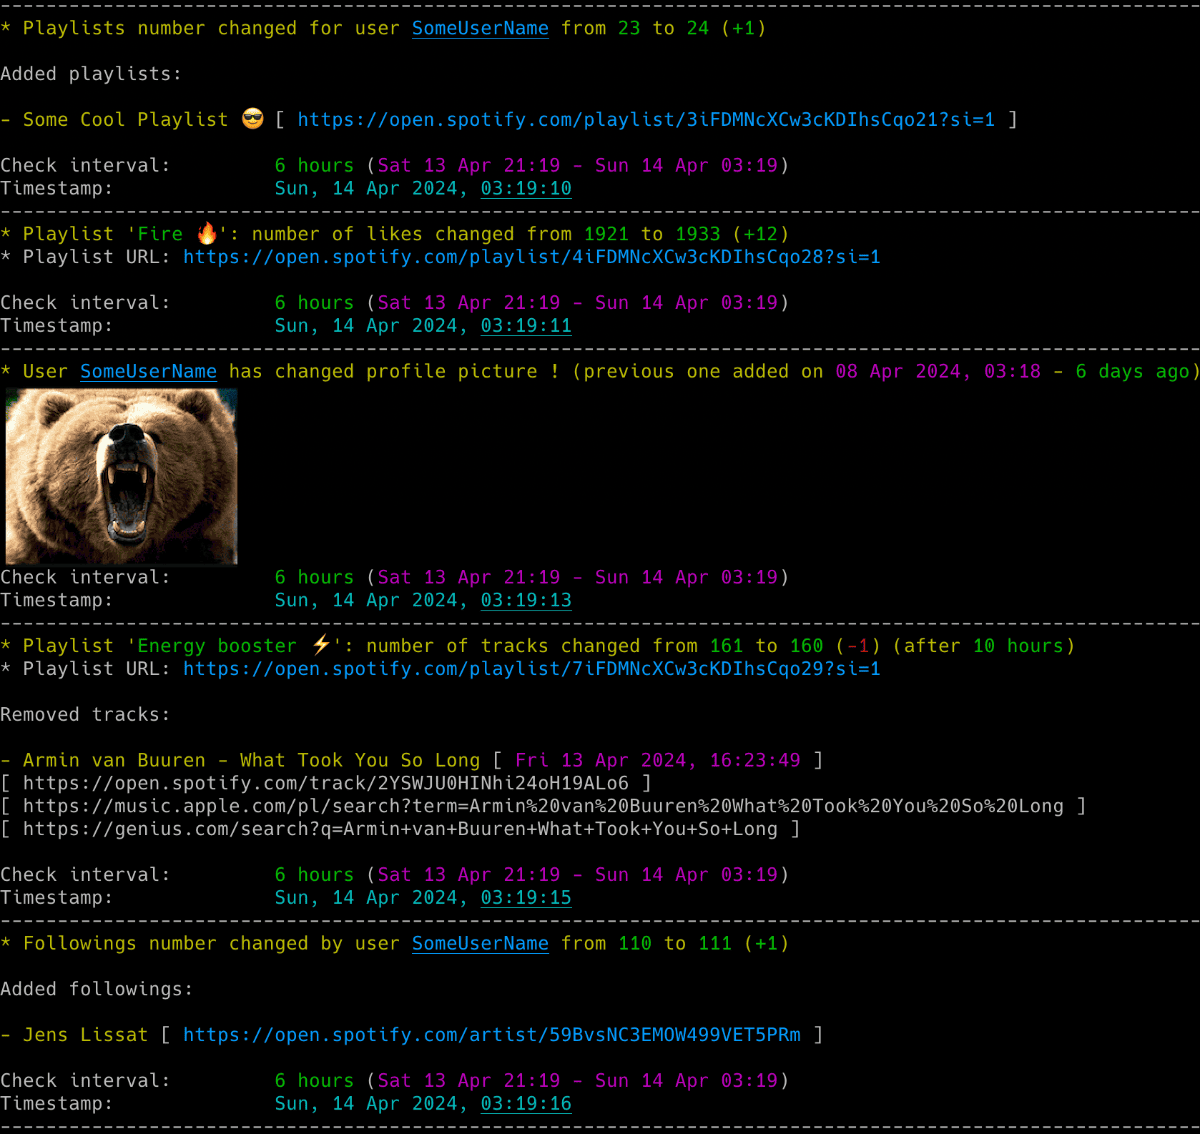
Example email:

If you want to save all profile changes (including playlists) to a CSV file, set CSV_FILE or use -b flag:
spotify_profile_monitor <spotify_user_uri_id> -b spotify_profile_changes_spotify_user.csvThe file will be automatically created if it does not exist.
The tool can detect when a monitored user changes their profile picture. Notifications appear in the console and (if the -p flag is enabled) via email.
This feature is enabled by default. To disable it, either:
- set the
DETECT_CHANGED_PROFILE_PICtoFalse - or use the
-jflag
Since Spotify periodically changes the profile picture URL even when the image is the same, the tool performs a binary comparison of JPEG files to detect actual changes.
On the first run, it saves the current profile picture to spotify_profile_<user_uri_id/file_suffix>_pic.jpeg
On each subsequent check a new image is fetched and it is compared byte-for-byte with the saved image.
If a change is detected, the old picture is moved to spotify_profile_<user_uri_id/file_suffix>_pic_old.jpeg and the new one is saved to:
spotify_profile_<user_uri_id/file_suffix>_pic.jpeg(current)spotify_profile_<user_uri_id/file_suffix>_pic_YYmmdd_HHMM.jpeg(for history)
If you have imgcat installed, you can enable inline display of profile pictures and playlist artwork directly in your terminal.
To do this, set the path to your imgcat binary in the IMGCAT_PATH configuration option.
If you specify only the binary name, it will be auto-searched in your PATH.
Set it to empty to disable this feature.
By default, all Spotify-owned playlists are skipped from processing, i.e. the tool won't fetch or report changed tracks and the number of likes for them. This is because they are typically dynamically generated with a high volume of changes in terms of likes and sometimes tracks as well. You can change this behavior by setting IGNORE_SPOTIFY_PLAYLISTS to False.
On top of that, you can also use the PLAYLISTS_TO_SKIP_FILE / -t flag which allows you to indicate a file with additional playlists to be blacklisted.
The file may include lines referencing playlist URIs and URLs, as well as the playlist owner's name, URI and URL. Below is an example of an ignored_playlists file with acceptable entries:
playlist_uri_id
spotify:playlist:playlist_uri_id
https://open.spotify.com/playlist/playlist_uri_id
https://open.spotify.com/playlist/playlist_uri_id?si=1
Some User Name
user_uri_id
spotify:user:user_uri_id
https://open.spotify.com/user/user_uri_id?si=1
You can comment out specific lines with # if needed.
If certain playlists are blacklisted, there will be an appropriate message. For example:
- 'Afternoon Acoustic' [ IGNORED ]
[ https://open.spotify.com/playlist/37i9dQZF1DX4E3UdUs7fUx?si=1 ]
[ songs: 100, likes: 2164491, collaborators: 0 ]
[ owner: Spotify ]
[ date: Fri 23 Aug 2024, 17:05:15 - 7 months, 10 hours, 27 minutes ago ]
[ update: Fri 23 Aug 2024, 17:05:15 - 7 months, 10 hours, 27 minutes ago ]
'Unwind and let the afternoon unfold.'
If you want to customize polling interval, use -c flag (or SPOTIFY_CHECK_INTERVAL configuration option):
spotify_profile_monitor <spotify_user_uri_id> -c 900The tool has several signal handlers implemented which allow to change behavior of the tool without a need to restart it with new configuration options / flags.
List of supported signals:
| Signal | Description |
|---|---|
| USR1 | Toggle email notifications for user's profile changes (-p) |
| TRAP | Increase the profile check timer (by 5 minutes) |
| ABRT | Decrease the profile check timer (by 5 minutes) |
| HUP | Reload secrets from .env file and token source credentials from Protobuf files |
Send signals with kill or pkill, e.g.:
pkill -USR1 -f "spotify_profile_monitor <spotify_user_uri_id>"As Windows supports limited number of signals, this functionality is available only on Linux/Unix/macOS.
You can use GRC to color logs.
Add to your GRC config (~/.grc/grc.conf):
# monitoring log file
.*_monitor_.*\.log
conf.monitor_logs
Now copy the conf.monitor_logs to your ~/.grc/ and log files should be nicely colored when using grc tool.
Example:
grc tail -F -n 100 spotify_profile_monitor_<user_uri_id/file_suffix>.logTo help with troubleshooting and development, two debug utilities are available in the debug directory of the related spotify_monitor project.
The spotify_monitor_totp_test tool retrieves a Spotify access token using a Web Player sp_dc cookie and TOTP parameters.
Download from here or:
wget https://raw.githubusercontent.com/misiektoja/spotify_monitor/refs/heads/dev/debug/spotify_monitor_totp_test.pyInstall requirements:
pip install requests python-dateutil pyotpRun:
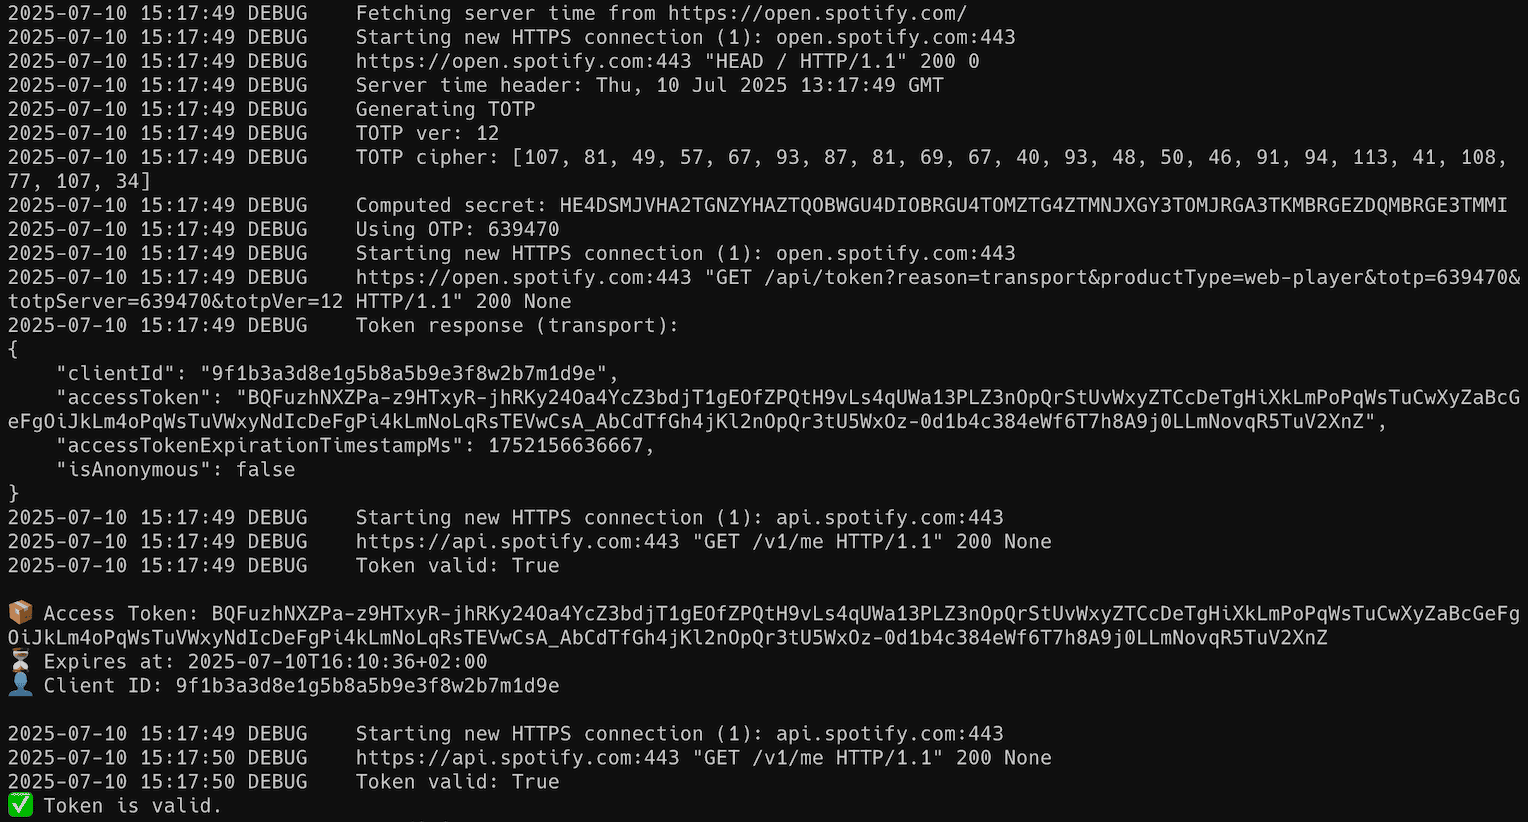
python3 spotify_monitor_totp_test.py --sp-dc "your_sp_dc_cookie_value"You should get a valid Spotify access token, example output:
NOTE: secrets used for TOTP generation (
SECRET_CIPHER_DICT) expire every two days; you can either run the spotify_monitor_secret_grabber and extract it by yourself (see here for more info) or you can pass--fetch-secretsflag inspotify_monitor_totp_test(available since v1.6). There is also a Thereallo1026/spotify-secrets repo which offers JSON files that are automatically updated with current secrets (you can pass--download-secretsflag inspotify_monitor_totp_testto get it automatically from remote URL, available since v1.8).
The spotify_monitor_secret_grabber tool automatically extracts secret keys used for TOTP generation in Spotify Web Player JavaScript bundles.
Download from here or:
wget https://raw.githubusercontent.com/misiektoja/spotify_monitor/refs/heads/dev/debug/spotify_monitor_secret_grabber.pyInstall requirements:
pip install playwright
playwright install
Run:
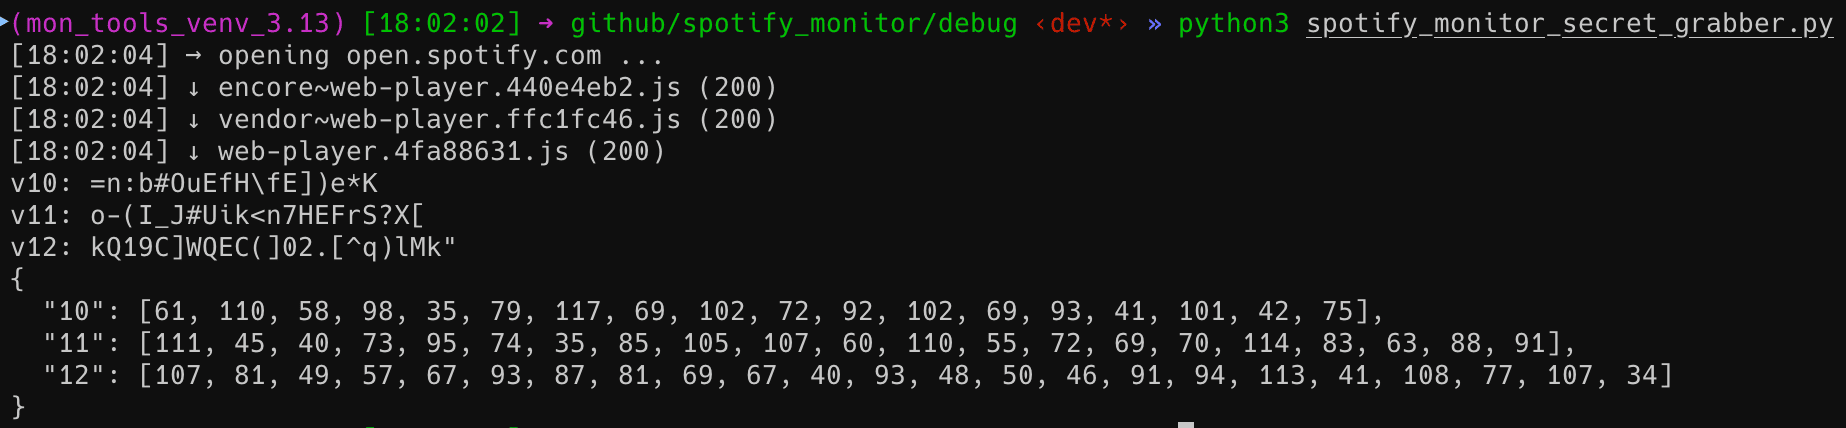
python3 spotify_monitor_secret_grabber.pyYou should get output similar to below:
You can now update the secrets used for TOTP generation (for example SECRET_CIPHER_DICT in spotify_monitor_totp_test, spotify_monitor and spotify_profile_monitor).
NOTE: you can also use Thereallo1026/spotify-secrets repo which offers JSON files that are automatically updated with current secrets (its secret extraction code is based on
spotify_monitor_secret_grabber).
See RELEASE_NOTES.md for details.
Licensed under GPLv3. See LICENSE.